Sunday, May 31, 2009

2nd Brimtok battle

The Brimtok Campaign is off to a good start finally. Another game has taken place between my Mantis Warrior space marines and my brother's Tau forces. Our battle this time was a 1500 point space marine force versus 1000 points of Tau. Advantage marines, but the Tau got extra bonuses in the form of orbital bombardment and anti-plant barrage. The struggle was for an observation post located in a mountainous and forested region. Unfortunately, I don't have any mountain terrain, so hilly would have to do (small hills). You be the judge:


The mission was Annihilation and the deployment was Dawn of War.  Not a good prospect for the Tau, as they were on the short points end of the stick. This time I thought I would put my heavy hitters in the center of the line and flank with lighter forces.

Marine scouts infiltrate through woods and brush.


Too late! Tau infantry have reached the larger post. Tau commander approaching.


The Crisis battlesuits moving in with a unit of gun drones.
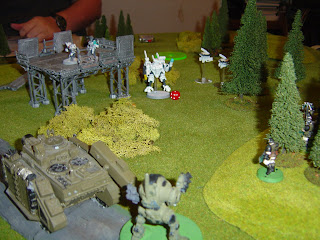
The allied Leman Russ could pose quite a problem!
The Tau commander is moving under the platform.


Scouts reach the edge of the woods and engage the Tau. One scout down!

The attack bikes moved around the scout's side to flank the large platform. By now, the Tau had taken the smaller platform as well and a hovercraft was entering the field by that tower. My Chaplain joined a squad of tactical marines heading for the small platform while my Devastators, Whirlwind, Vindicator, and Dreadnought headed toward the Leman Russ.

The Mantis Warriors move up.

The Landspeeder and attack bikes figured to flank the large platform and engage the gun drones and Crisis battlesuits. The scouts job was to pin the Tau infantry in the platform. The Whirlwind wanted to stay out of line of sight and fire barrages. But what to do about the Leman Russ?

Mantis Warriors keep the Tau from taking the platform.
But watch out for the Hovertank!

I tried to knock out the Tau vehicles with Hunter Killer missiles, but those all missed. All fire directed at the Leman Russ was either too short or missed. At least the Tactical squad kept the Tau infantry from advancing. Lucky for me, the Tau commander kept forgetting to use his marker lights and guided missiles launched from the hovertank! This would have been a perfect time for the Tau to use an anti-plant barrage to wipe out the cover for the marines, but it was completely forgotten. Unfortunately, for the Tau, the opening orbital bombardment was a disappointment as well.

Frack! The Crisis unit has joined up at the platform and begins eliminating the scouts. 

Bad luck for the marines. The Landspeeder gets shot down, and the attack bikes take hits. The Vindicator weapon is destroyed, and no missile launchers seem able to get any glancing hits on the Leman Russ. Then luck changes a bit. A lascannon hit stuns the Leman Russ crew. The Tau commander rushes out to engage the tactical squad.

Tau Crisis battlesuits attack!

David launched his Crisis unit toward the scouts to use his flamers. The scouts took casualties but stayed in action. The gun drones were whittled down by the attack bikes. And now, the Crisis unit was in view of the dreadnought.

Tactical Squad and Chaplain Maximus engage the Tau commander.

The tactical squad assaulted the Tau commander and cleaned his clock. The dreadnought began picking off Crisis battlesuits. The Whirlwind made a mess of Tau infantry on the platform.
The Dreadnought makes a mess of the Crisis Unit.

The Dreadnought eventually finishes off the Crisis unit, the remaining scouts finish the Tau on the platform, and the attack bike ends the gun drones. The lascannon in the devastator unit has had the only luck with the Leman Russ so far.

Chaplain Maximus and the Tactical squad assault the Leman Russ!

The consolidation of the tactical squad after defeating the Tau commander put them in range to assault the immobilized Leman Russ (lucky lascannon shot!). Their grenades did the trick just barely, knocking out the tank. The Tau now remembered to use their marker lights but failed to get a lock. The hovertank moved in towards the smaller platform to engage the marines.

Last moves of the Tau. Their marker light just wouldn't engage!

Maximus and the boys assault the hovertank!

Maximus and the Tactical squad just barely manage to knock out the hovertank at the end. I forget who wiped out the last of the Tau infantry. A devastating win for the Mantis Warriors.

Our next battles should be a couple of 500-point patrol games of Space Marines versus the Space Orks!

For the SNS game night in June, we're planning two games: Field of Glory ancients, and some sort of WW2 dogfighting game in the Pacific. This weekend many of us will be involved in the GAJO store D-Day games using Flames of War.

Saturday, May 16, 2009

Saturday Gamenight

On our last SNS gamenight, our clubmembers organized two games. Out in the main lobby of GAJO's store, I set up a game on one of the 6 x 4 tables. It was a French & Indian War skirmish using the Warhammer Historical rules, Legends of the High Seas. LOTHS is basically a pirate skirmish rules game, but it covers the basic black powder period so I thought I'd try a different theme to it. In the scenario, a force of French-led warriors is raiding the frontier while the settlers must defend their homesteads with the help of a squad of British soldiers and frontiersmen. The actual object of the battle was for both sides to keep possession of Mrs. Jones, a settler with wide reputation for her cooking skills. She had to be protected at all costs!

The French and indian forces deployed randomly off table edges after the colonials had set up. As luck would have it, most of the native units deployed close to the cabin where Mrs. Jones was holed up with the militia. The British soldiers were located by a barnyard in the center of the table while the best unit on the table, named the "Albany Rangers" were positioned on a hill some distance away!


Seen above, the French Captain in charge of the raid led a Canadian militia section across the fields to try to pin down the British soldiers and keep them from reinforcing the settlers in the cabin (upper left corner). Unfortunately for Dennis, his men were gunned down by the Redcoats and long range fire from the Rangers who were coming off the hill off picture to the right. Eventually the French Captain and a couple of his men faced off in the barn against the British officer and his men. In a classic sword and bayonet duel, the French officer and his men went down fighting.


My poor roll for deployment landed my band of warriors led by Thunder Badger into a swampy marsh. I could see there were plenty of warriors attacking the cabin so I decided to try to get past the marsh and hold off the Albany Rangers before they could help the colonial militia. Unfortunately the wetlands really slowed me down. At least there was some vegetation as cover.


As my band of braves emerged from the marsh the rangers were taking aim from the edge of the woods at the bottom of the hill. A lively firefight began. In the meantime, the warriors attacking the cabin were being pinned down in a stream gully . Dave's militia were picking off some of their attackers from loopholes made in the cabin walls. Terry and Jeff (visitor for that game) were organizing for a rush from the stream embankment. With the failure of the French Captain and the Canadian militia, for some reason the British Captain and a couple of his men pulled away from the farm  - perhaps a "strategic regrouping"?

Crazy Squirrel and Red Hawk led their warriors from the stream embankment for a rush to the cabin. The militia seen outside the cabin are assumed to be inside at the loopholes. After a couple of volleys some warriors fell, but others quickly surrounded the cabin and hand-to-hand combat began. Some warriors set fire to the empty barn, the militia outside of the cabin at the fence were dispatched, and a warrior pulled Mrs. Jones out of the cabin! Belatedly, the British Captain began heading back to the cabin. Unfortunately, Thunder Badger's warriors attempted to engage the rangers in hand-to-hand, and Norm rolled better than I did. Thunder Badger and two of his warriors survived to escape back through the marsh. At least they kept the rangers from reinforcing the cabin fight! The French and Indians won the day with the capture of Mrs. Jones.  

Everyone said they enjoyed the skirmish. I think we were all surprised at how the LOTHS could be applied to other-than-pirate scenarios. We'll be playing these rules again. Quick to learn, and easy to modify. The figures are all painted by GAJO. I'm slowly building up enough forces to do a more tactically  oriented game using the rules This Very Ground by Iron Ivan.

The other game was going on at the same time in the back room on the larger table.


Gary, Lynn, and Paul were playing a large game of Flames of War set in Normandy 1944. I have to apologize to the guys, most of the pictures I took of that game turned out poorly. Here we see Paul's panzer forces advancing through hedges and fields. I love the sunflower field that Chris created (originally made for the Kursk game). It's created in sections so that as vehicles drive through the sections are removed as flattened.  I don't know how the game went. I suppose if people want accounts of the games I don't play in to be posted, they'll just have to email me a report! I'll try to do better at photographing the other games though.

Next month we'll be playing Field of Glory ancients and Johnny Reb III American Civil War. Should be fun! We've also decided that we're not playing enough FOW games... so we've created an Auxiliary gaming night starting next month.

Wednesday, May 6, 2009

Brimtok Campaign - 1st battle


Some of us in the group also dabble in various sci-fi and fantasy games, including the various Games Workshop products. Nothing like a campaign to provide incentive for gaming, so Dave Baker created a planet named Brimtok which needs fighting over. It seems the industrious Tau have been spreading their influence throughout the region, and have managed to swing over planet Brimtok to their side. The Imperial Guard regiments stationed there have given up on the Imperium and have sided with the Tau. Well, we can't have that now, can we? So, the Space Marines have been summoned to give each side a bloody nose and sort things out. Unfortunately, some Chaos forces and their allied Ork forces have entered the arena in the hope of taking advantage of the mess.

Our first game pits my Mantis Warrior space marines versus a combined Tau/Traitor Guard force. 1500 points against about 1200-1300 points. The photo at the top is our battlefield, an Imperial orchard farm.


Above, Dave D sets up his Tau/Guard with fast forces on the wings and the Tau commander and a Leman Rus in the center. Marine objective is the hill.

The Mantis Warriors deployed in similar fashion. The Tau objective is the farm building.


As the battle begins, one of the planet's giant natural lifeforms makes an ominous appearance! Slightly larger than an Ork Stompa and smaller than a Titan, the enormous felinus giganticus (who goes by the name of "Mutton") strode across the battlefield, perhaps attracted by all the commotion. Weaving between the large yet deftly moving legs of the creature, a Tau squad moves forward to support their advancing right wing recon.

Mantis Warriors engage the Tau right wing. The scout scout moves quickly into the orchard while the Rhino and dreadnought move up. The landspeeder begins gunning down hovering drones before turning toward the Tau hovercraft.

The Tau commander moves up a well as the Guard tank. The tank is the 800 pound gorilla in the room. How to stop it?

Mutton the war cat settles down in a nearby lair, oblivious to the noises of battle nearby. The Mantis Warrior assault bikes and Devastator squad begin picking off the Guard sentinels.


On the marine left,a shootout begins between the Tau and Mantis Warriors. The Landspeeder is shot down but takes out half the drones. A squad of marines debarks from the Rhino before it might get destroyed...

The Sentinels take hits. In the center (left of picture), the marine Vindicator and the Guard Leman Russ trade wasted shots at each other.

Aaaieee! Disaster hits a Guard squad. Well, actually it was heavy bolter fire, not the giant claws reaching out for tasty morsels of mortals.

As the Leman Rus moves toward the Vindicator in the center of the marine line, a Guard squad moves through an orchard in support. Vindicator fire is joined by Whirlwind fire, but nothing seems to slow down the tank.

Attrition on the marine right wing. The assault bikes are lost but the Devastator squad takes out sentinels and guardsmen. 


The Tau commander engages in hand-to-hand with the scouts in the orchard. Not seen on the marine left, the Tau lose the drones and hovercraft. The dreadnought moves to assist the scouts. In the center, the Vindicator is finally destroyed (has not survived a game yet) and the Terminators take some casualties but wipe out the Guard squad. Tau infantry drop like flies (big, humanoid ones). 

Then we ran out of time, and called the game. The Mantis Warriors just squeak by on points, with no objectives taken by either side.  Good game to learn the rules, however!