Sunday, August 15, 2010

Blackpowder Big Bash

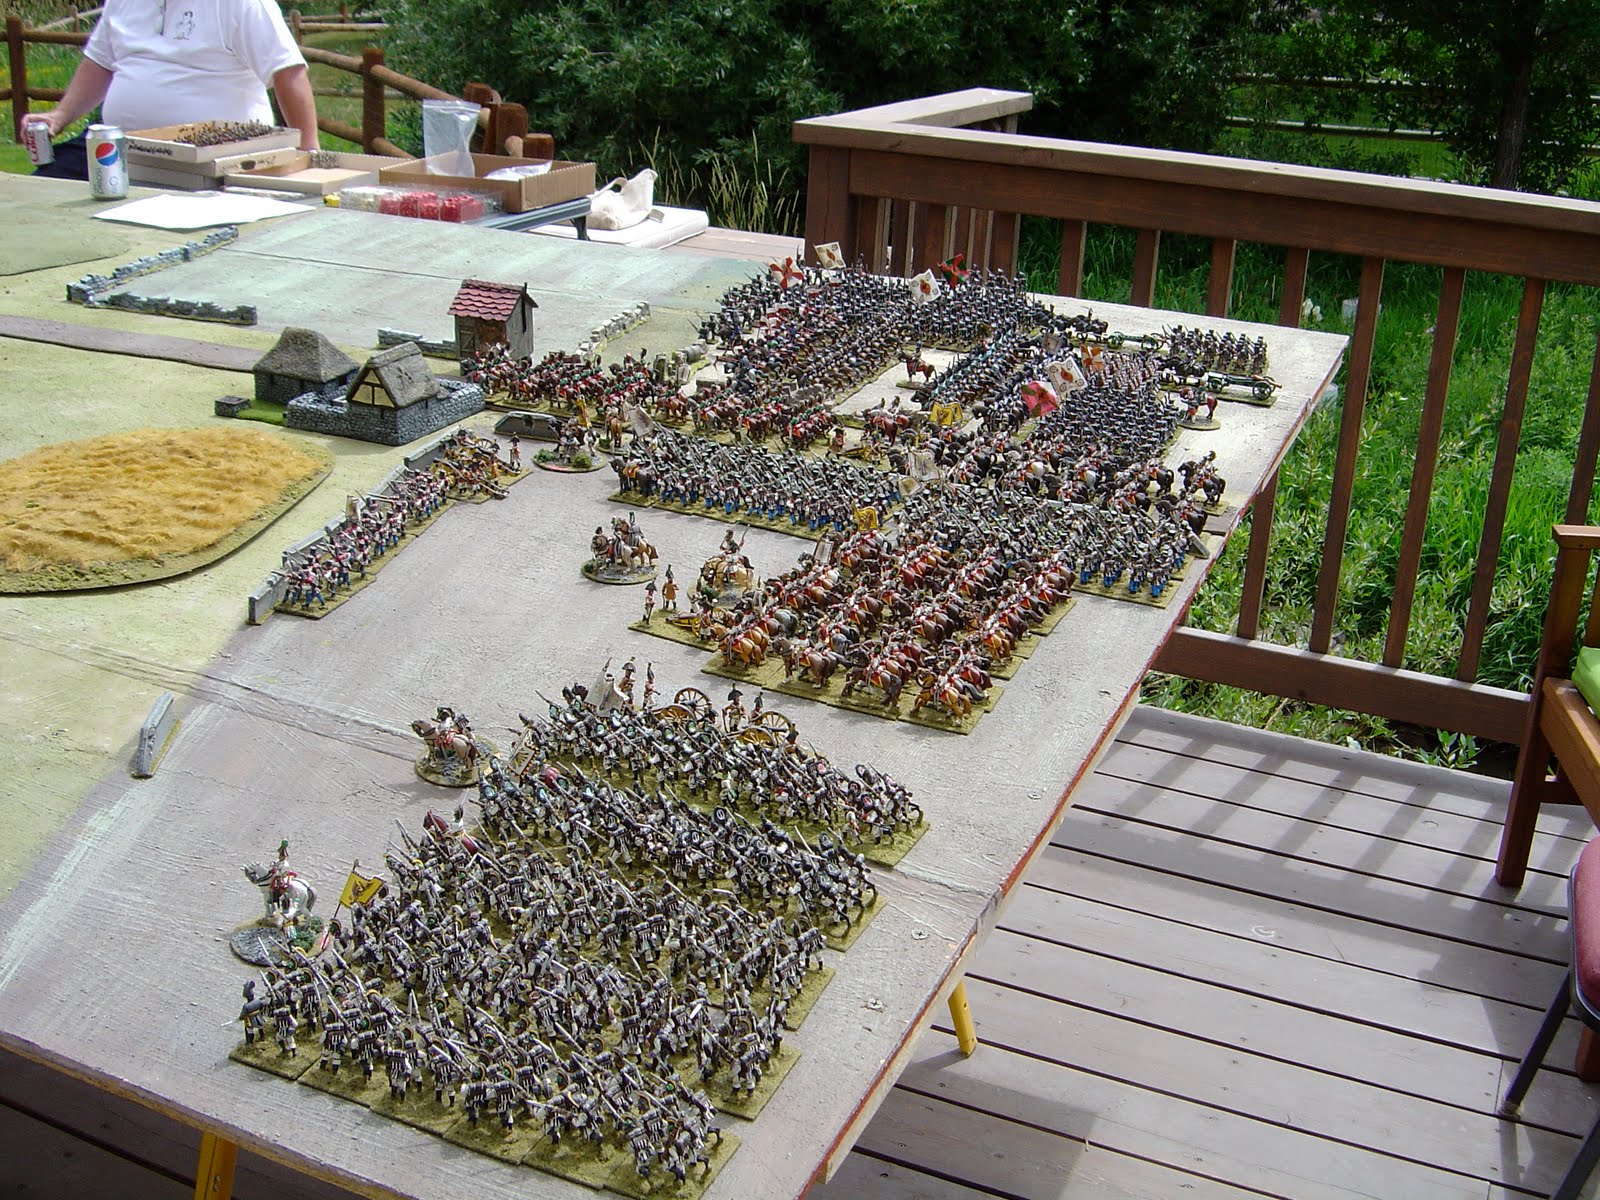
Kenn's BIG table outside. View from the east, I think.

On the last Saturday in July, Kenn invite the clubmembers to a gigantic game of BlackPowder napoleonics held at his home up in the mountains. The scenario was loosely based on the "what if?" idea that Napoleon had slipped away from a tactical victory at Waterloo and was rushing eastward to defeat the Austrians and Russians who had a little bit of help from Prussians and English troops as well. Actually it was a great excuse to use all of our club's 28mm napoleonic forces in one giant game! Ken had built a giant table on his backyard porch for the event. Unfortunately, it was one of the summer's hottest days and the minis got a bit warm to the touch. SO did some of the players... actually I think I melted, just a bit... but we survived. We also took a a break midway through the game for a cookout with sausages, bratwurst, and lots of delicious salads and chips. A great game as well. Thanks to Kenn and everybody who helped make it fun.

Austro-Russian deployment in the west. Austrians closest to camera. This turned into a giant traffic jam along the road, as the off-camera woods to the east were quickly occupied by the French and held throughout the game.


In the foreground, the obstructing woods. Mike's casualty counters at the ready. A giant alien bowl of chips has landed in the battlefield, only temporarily. Stella the Wonder Dog patrols for dropped food.

The Monster of Europe appears to lead his troops in battle. Hmmm, safe behind the artillery, I see...

The French columns move towards the eastern town.

Clash of Titans. The French win this one.


French artillery and cavalry move to block the advancing Russians.


For now the Prussians and British hold the town.


Allied defenses in the town. The mysterious moving Coke monument in the background.


Overall view. It's hot, very hot, yet we're still very much into the big game concepts outlined in the BlackPowder rules.


For much of the game the traffic jam continues, as the Austrians and Russians have command roll problems getting their troops forward into battle, and the French gleefully launch cavalry regiments at the leading columns.


On the left, the French hold the obstructing woods. In the center, Austrian cuirassiers capture a battery and battle the enemy cavalry. On the right, the Russians finally get rolling.


Command problems keep the Asutrian heavy cav from charging when they need to... their flanks in danger.


Austrian infantry shift their attacks on the woods to one flank.


French columns hit the town defenses. Nasty, and complicated.


The Russians push out of the agricultural zone and head for a large hill covered with French.


Town ownership is in doubt, and the allied line moves back...


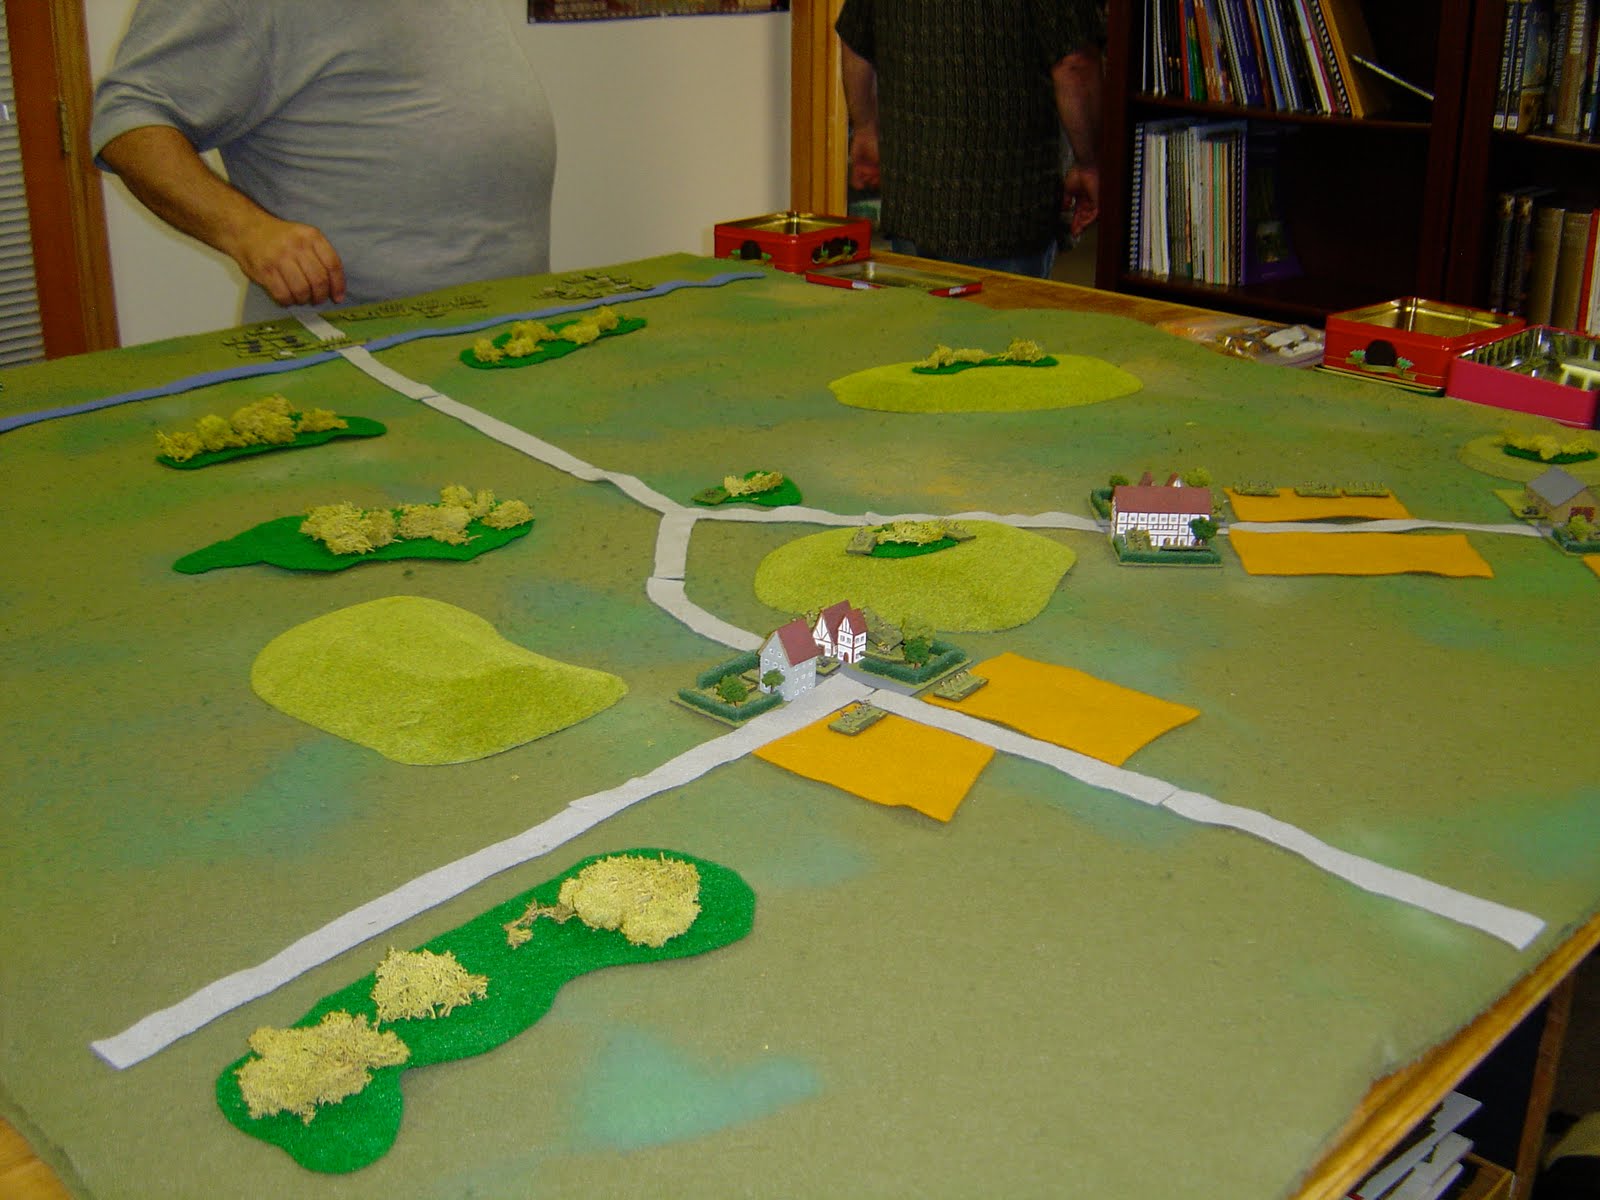
The French western defensive lines. Here come the Austrians and Russians...


French cavalry counterattack Russian infantry which I notice are not in square. Oops. Ouch. Crash!

The French have held those darned woods the entire game. But now the Russians and Austrians move down the road toward the dwindling French main line.

We had to stop the game when dark rain clouds appeared over the mountain tops. We could tell Salt Lake City, on the other side of those mountains, was getting hit good, so it was only a matter of time for us, and take down would take a while. Still, the game was enjoyable, the food and companionship excellent. Another big bash will occur.

Monday, August 9, 2010

BKC with WFHGS

WW2 Soviet armor columns rush to the front lines.

Normally I don't post much on games I play with the Wasatch Front Historical Gaming Society, as Matt Irsik usually takes the pictures and creates a battle report for that club's blog, at http://www.wfhgs.com. Unfortunately, Matt and a few of the other gamers couldn't make to their last game, so I've got some pictures I'll post here. We played BKC, WW2 microarmor on the Russian front. I used a terrain layout similar to the game Russ and I played. In this scenario, the Soviets have occupied a couple of towns with infantry. German armor and infantry are counterattacking and Soviet tank brigades are trying to reinforce. The beauty of this game is that the command system must be used carefully of command foul-ups can wreck your plans in a hurry!

Germans deploying on the far right. In the right corner, a Panzer IV battalion is beginning a flanking sweep around the occupied town. It was at this point that the dice began to roll badly for the Soviets!

Good command rolls place the Panzer battalion on the flank of the dawdling T-34's.


Soviet command can barely manage to deploy one battalion to face the panzers. The rest of the column failed to move!


The Germans learn from Sgt. York, the turkey shoot begins. T-34's and SU-76's burn after several very good German command phase rolls.


Some damage to Pz IV'x as the Mech Infantry move to attack the river crossing.


Meanwhile, Dave D's Russian tanks and infantry try to hold back Gary S's Assault guns and Tiger.


Endgame. PanzerGrenadiers occupy the river crossing and cut off the Soviet supply route. With the armor destroyed, the infantry in the villages can't last long.

Thursday, August 5, 2010

July's SNS game: BKC!

Overall view. Germans are crossing the river at far left.

BKC stands for Blitzkreig Commander, a WW2 armor game where a miniature or stand of troops can either be a platoon or a single squad/tank. Based on the Warmaster Ancients system (and heavily modified) I love this command control mechanism and a game of BKC is never boring. I modified a scenario from Avalanche Press' Eastern Front board game. The Germans would be crossing a river to invade the Soviet Union on the first day of the Eastern blitzkreig. The German player, Russ, had to make dice rolls to see if the infantry and vehicles made it across on ferries, rubber rafts, or wading equipment while the engineers tried to disable a roadblock on the bridge.

Meanwhile, the two Soviet battalions one in each town, could not deploy until their HQs rolled for an activation. There was little Soviet armor available. The Germans had to seize at least one town and exit troops from the table.

The first of the German armor and infantry deploy towards the road fork.

The German plan seemed to be send the armor down the road and cover the flanks with the two infantry battalions. At first the only Soviet unit ready for action was a battery of 45mm AT guns. However, out of command range, they could only act on initiative! Back at the bridge, the German pioneers seemed to be having difficulty clearing the bridge, so more tanks tried to wade the river.

The lead German armor reaches the range of the Soviet 45's. Battle begins!

The right flank German infantry made very good progress, while a second wave of armor and the right flank battalion moved more slowly. The Soviet 45mm tried to engage the lead armor, but scored few hits. The pioneers at the bridge still had trouble with the roadblock, and the German motorized column waited impatiently on the far side of the river.


Germans organize a better attack, and take out the ATG battery.

As the armor advanced, the hapless 45 mm ATg crews were wiped out and the armor prepared to deploy towards the two towns. In the towns, the Soviet command had a terrible time trying to organize themselves into a defense. The regimental command finally got a couple of 76mm batteries in position to try to slow down the enemy, and the T-26 company finally began moving.

The Soviets prepare to defend their towns.

The 76mm battery on the Soviet left was overrun on the hill as the German right flank began to encircle the left town. On the Soviet right, it too soon had a line of advancing infantry converging on the town as the Soviet command finally got their act together to organize resistance. On the central hill, incoming tank fire soon neutralized the regimental troops and the German armor split to attack both towns.


Hurrah! A panzer II platoon burns.

The Soviet fire made hardly a dent on the German armor, although the German left flank infantry battalion took some hits from small arms fire in the town. Suddenly a blunder on the part of the Germans... Friendly Fire took out the leading Panzer II platoon!


The German right flank assaults the first Soviet town.

Russ executed a brilliant assault on on my left flank and soon the Soviets had lost half the town. Return fire managed to take out a couple of infantry platoons and a tank, but it was obvious that the Germans were winning. Time had run out, the Regimental command stand was fleeing, the leftmost town was falling, and the German motorized column had finally arrived and was destroying the Soviet right flank. Germans won. Of course, it was just the first day of the invasion.

Wednesday, August 4, 2010

WOW- Balloon Buster!

Balloon Busting!

Wings of War has a really neat addition to their game of WW1 aerial combat. They offer two different color observation balloon sets. Each set comes with a balloon in either olive drab or yellow, and a rocket-firing Nieuport biplane. I purchased the yellow balloon set, and looked for an opportunity to play.

I set up a WOW game for one of our Saturday night games. Chris volunteered to be my opponent. For this scenario, the game lasts 12 turns. That's how long it takes for the ground crew to winch down the observation balloon and save it from destruction. Chris took the side of the Germans, with the balloon, several ground AA cards, and an Albatross defender. My raiders were a silver Nieuport and the brown Nieuport with the rockets. The picture at top shows the middle of the game with the Balloon winching down and the Nieuports making their attack run. Underneath the silver Nieuport is the Albatross card. Altitude rules are in effect, and the Albatross was underneath the Nieuport so we replaced the model Albatross with the card temorarily until the planes moved apart. Behind the balloon, the brown Nieuport with the rockets is making an attack run from the other side.


Preparing to fire the rockets. The planes passing underneath realize their peril.

In the game, the balloon busters need to cause enough damage to the balloon so that it either becomes incapable of floating and crashes to the ground, or explodes in flames. Another option is that the balloon observers may decide to abandon the basket and parachute to the ground, which counts as a mission kill as the balloon has to interrupt it's observation mission anyway to lower down and get a new observer. Of course we really just want to blow up the balloon!


Kablam! The balloon explodes and takes out the brown Nieuport.

The result of the attack was a pyrrhic victory for the French. As the Albatross and silver Nieuport passed under the balloon, the brown Nieuport fired its rockets which ignited the balloon! While the first two aircraft zoomed away from the situation the brown Nieuport got too close and the resulting flaming explosion caused enough damage to down the plane on the spot.

The remaining Nieuport makes a run for it.

With the balloon destroyed, the remaining Nieuport made a break for the Allied lines. With the Albatross in hot pursuit, it seemed an impossible task as the Nieuport had already taken hits from ground fire, and now had to weave its way through the defenders again! Time after time the Albatross zeroed in on the Nieuport. What Chris didn't realize was that I was experiencing extremely good fortune, as each time a took a damage card, I got a card that usually worth 0 damage points! Eventually I reached safety for an allied win. I showed Chris my cards (over 15 cards) and he couldn't believe my good luck.

I doubt I would be so lucky next time!

Tuesday, August 3, 2010

Summer Update

Another game of AOE, Corruna scenario again, using terrain from GAJO. Tons of fun.

I have to apologize to my readers, I've been neglectful of my blogging duties and must repent.
My bad.

OK, now that's over and time to post pictures.

FOW. One of the many battles for Bois de Bavant Nord.

The SNS group has been deeply involved in an FOW campaign devised by Craig Tyrrell who runs the GAJO store. It's based on Operation Goodwood, where the British are trying to break out of Caen and thrust armored forces past the German defenders. Things went well for the Commonwealth at first, due to overwhelming artillery, airpower, and naval bombardments. The British armor and infantry steamrollered over the dazed defenders and pushed into the fields of France. However, the German defense stiffened and began clobbering the Commonwealth units. Two territories are being constantly battled over. In the picture above, my British armored company is getting quite royally spanked by Norm's dug-in German grenadiers. As of this writing a third battle is being planned for that same wooded area. The second is in the picture below.

The ruins of Faux de Vaucelles.

Across the canal from Caen, German infantry regiments counterattacked at F. de Vaucelles just after a Canadian infantry brigade passed through. Thoroughly entrenched, these German defenders have beaten off assault after assault, trapping the 4th Canadian brigade in Fleury-sur-Orne and cutting them off from supply. Now at turn 7, another attempt is being made to get out of Caen and reopen the lines to the 4th Canadians, who themselves are under attack by panzergrenadiers. It's going to be a tough turn.


Might and Reason. 15mm SYW.

Chris from GAJO put on a game of Might and Reason, Sam Mustafa's brigade-level game of the Seven Years War. Scenario was Prussians versus Austrians. In this game, two stands together represent a brigade of troops. A little different than Grande ArmeƩ, Mustafa's Napoleonic game, but very fun. In fact I think these rules came off better than GA. Chris is slowly building up each of the major and minor armies required to play a massive campaign using the board game "Soldier King" by Avalanche Press. I've volunteered to help paint the Turks, but I'm off to a very slow start.

Sharp Practice. French companies on the march.

Dave Baker has assembled a force of 28mm British troops to use in Sharp Practice, a small-tactical game for Napoleonics. Off course as soon as he was ready the French had a go at the Brits. I modified a scenario from Charles S. Grant's Scenarios for Wargames book for the WFHGS group. Very fun. Both the WFHGS and SNS members enjoy this great game.

Dave B's British infantry defending the woods. Each unit represents a company.

The advent of Victrix and Perry plastics for Napoleonics has really made these larger games possible for more members. However, some of the figures can be difficult to pose. Some of the members have been hiring Chris at GAJO to help paint their figures so that we can more quickly get some games played. These figures are also often used for our Black Powder napoleonic battles.

The US fleet takes a pounding from the Japanese in 1943.

Naval games have not been forgotten. Russ put on a game of Micronauts: The Game for our Armchair Admirals night. Played in 1/2400 scale, the detail on these GHQ ships is fantastic. The scenario was a recreation of the Battle of Komandorski Islands. This time, instead of battling it out at long range as occurred in the actual conflict, Norm raced the Japanese fleet directly towards my American fleet. His fire was more accurate than mine, and soon the USS Richmond was badly damaged and at half speed. The US destroyers made a gallant effort to slow down the Japanese cruisers, but the high seas prevented effective torpedo launches and soon the US navy had lost four destroyers. With the battle lost, the Salt Lake City made a quick retreat leaving the doomed Richmond to her fate.

I'll get you yet, Norm!